
The need for architectural patterns in swift applications
With the recent introduction of Combine and SwiftUI, we will face some transition periods in our code base. Our applications will use both Combine and a third-party reactive framework, or both UIKit/AppKit and SwiftUI. This makes it potentially difficult to guarantee a consistent architecture over time. It is potentially hard to know when these new technologies will be incorporated in our projects. Making the right choice of architecture from the start may greatly ease the future transition.
Traditional architectural patterns like MVC, MVP, or MVVM mostly take care of the UI layer. They won’t be of great help when it comes to mix the aforementioned technologies inside your app in a unified way. For instance, MVVM in a UIKit application will rely a lot on two-way binding technologies with reactive extensions like RxCocoa or ReactiveCocoa. This will become less true as you gradually introduce SwiftUI and Combine. Chances are great that you will then have several architectural paradigms in your app.
VIPER is a little bit more complete as it describes the routing mechanism between scenes and the separation between models (entities) and the business rules that manage them (interactor). This pattern enforces the principles of Clean Architecture regarding separation of concerns and dependencies management. But, as well as the MVxx patterns, it does not guarantee a consistency of syntax and paradigm over time when adopting Combine or SwiftUI gradually.
SwiftUI is about state as the single source of truth and reacting to that state mutations. This allows for views to be written in a declarative manner, not in a verbose and error prone imperative manner.
In recent years, several architectural patterns centred around the concept of State have emerged: things like Redux or MVI and more generally unidirectional data flow architectures. Sometimes they offer to manage the state in a central fashion, sometimes in a local way. Those are great patterns and they fit very well with the idea of a state as the single source of truth. I’m pretty sure they had a great influence in the making of SwiftUI.
I myself have implemented some of these patterns in production applications. They introduced me to functional programming as they rely on concepts such as immutability, pure functions, function composition, and so on. Functional programming and state management fit very well together. Functional programming is associated to data immutability, so should be the state.
Nevertheless, I experienced some drawbacks with these kind of architectures which led me to discover feedback loop systems.
What is a feedback loop system ?
A Feedback Loop is a system that is able to self-regulate by using the resulting value from its computations as the next input to itself, constantly adjusting this value according to given rules (Feedback Loops are used in domains like electronics to automatically adjust the level of a signal for instance).

a feedback loop illustration
Stated this way might sound obscur and unrelated to software engineering, BUT “adjusting a value according to certain rules” is exactly what a program, and by extension an application, is made for! An application is the sum of all kinds of states that we want to regulate so as to provide a consistent behaviour following precise rules. The rules describing the allowed transitions from one value to another are described by a state machine.
What is a State Machine?
It’s an abstract machine that can be in exactly one of a finite number of states at any given time. The state machine can change from one state to another in response to some external inputs. The change from one state to another is called a transition. A state machine is defined by a list of its states, its initial state, and the conditions for each transition.
As an application is a state machine, it can be driven by a feedback loop system. A Feedback Loop is based on three components: an initial state, a feedback, and a reducer. To illustrate each one of them, we will rely on a basic example: a system that counts from 0 to 10:
- The initial state: this is the starting value of our counter, 0.
- A feedback: this is the rule we apply to the counter to accomplish our purpose. The output of a feedback is a request to mutate the counter. If 0 ≤ counter <10 then we ask to increase it else we ask to stop it.
- A reducer: this is the state machine of our system. It describes all the possible transitions of our counter given its previous value and the request computed by the feedback. For instance: if the previous value was 0 and the request is to increase it, then the new value is 1; if the previous was 1 and the request is to increase it, then the new value is 2; and so on and so on. When the request from the feedback is to stop, then the previous value is returned as the new value.
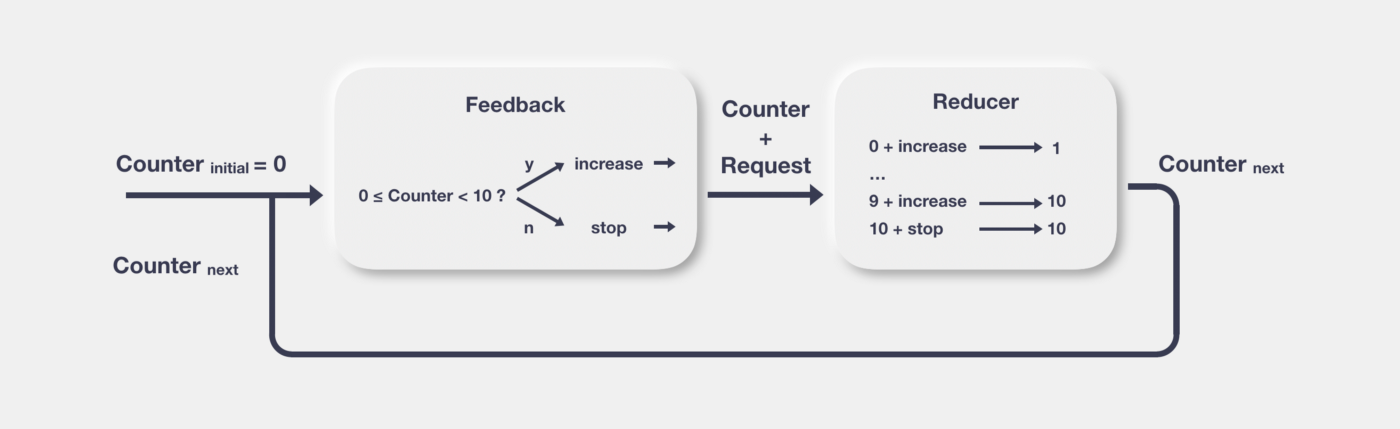
a feedback loop counting from 0 to 10
Feedbacks are the only place where you can perform side effects (networking, local I/O, UI rendering, whatever you do that accesses or mutates a state outside the local scope of the loop). Conversely, a reducer is a pure function that can only produce a new value given a previous one and a transition request. Performing side effects in reducers is forbidden as it would compromise its reproducibility.
The drawbacks of traditional unidirectional data flow architectures
As you can see, the particularity of the feedback loop paradigm is that the state is both an input and an output, both connected as a whole to form a unidirectional loop. We can use the state as a local cache to persist data as long as the loop is alive and running.
A typical use case would be the browsing of a paginated API. This kind of system allows for the use of the current state to always make the previous page URL and the next page URL accessible which makes irrelevant the need to store it elsewhere. In more traditional unidirectional data flow architectures, the state is only the output of the system. The inputs are “user intents” that trigger side effects and then state mutations.
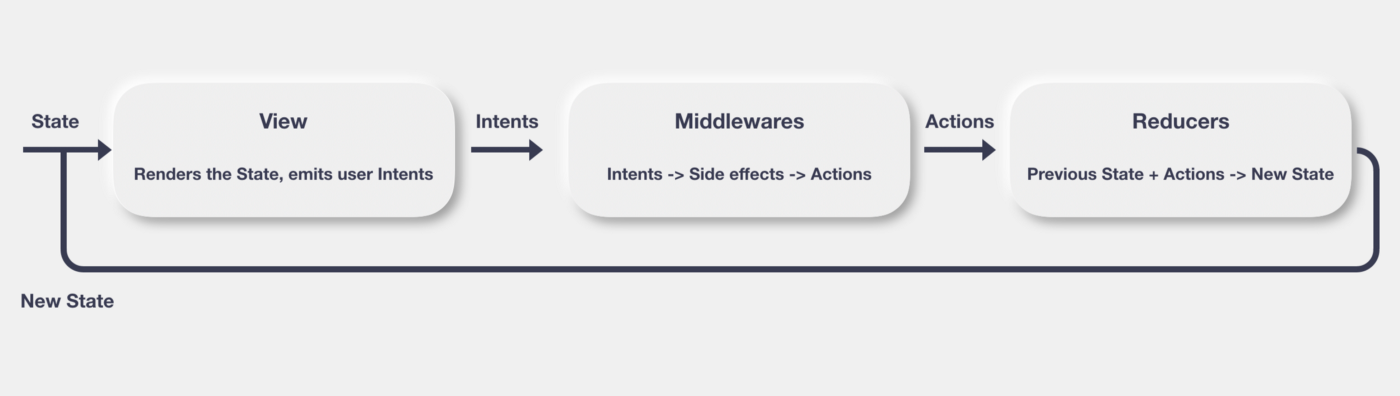
unidirectional data flow
I’ve experienced several versions of these kinds of architectures (Redux and MVI) and found myself stuck with 2 majors issues:
- Not having the state as an input can lead to maintaining a local state in the UI layer, or in a cache repository.
- Relying on input such as Intents or Actions, which are often enums, forces us to parse them with
switchstatements to determine the side effect to execute. As we add new intents or new actions we have to change the way we parse them, going against the Open/Close principle of the SOLID rules.
I’m not saying these issues are a “no-go” to use these architectures, nor am I saying I’ve used them the best possible way. For instance, I’ve worked on a variation of MVI where intents were replaced by a “command pattern”. Each command was responsible for its own side effect execution. There was no parsing, the command was self-sufficient. This approach is compliant with the Open/Close principle as adding a new feature is about adding a new command to execute; and not modifying the way intents or actions are parsed.
But rather than twisting those architectures to accommodate my needs, I vote for an approach that naturally addresses these issues: feedback loop systems.
What is Spin ?
Let’s get back to our main concern: provide an architectural pattern that can absorb the divergence of technologies we can expect in our applications.
As we saw, feedback loop is a pretty versatile pattern. It will help us mitigate the issue with mixed technologies. But we need a way to declare feedback loops in a unified way regardless of the underlying reactive framework or the chosen UI technology. This is where Spin comes into play.
Spin is a tool to build feedback loops within a Swift based application allowing you to use a unified syntax whatever the underlying reactive programming framework and whatever Apple UI technology you use (RxSwift, ReactiveSwift, Combine and UIKit, AppKit, SwiftUI).
Let’s try Spin by building a system that regulates two integers to make them converge to their average value (like some kind of system that would adjust a left and a right audio channel on stereo speakers to make them converge to the same level). We will need a data type for our state:
struct Levels {
    let left: Int
    let right: Int
}
We will also need a data type to describe the transitions to perform on Levels:
enum Event {
    case increaseLeft
    case decreaseLeft
    case increaseRight
    case decreaseRight
}
In order to describe the state machine ruling the transitions, we need a reducer function:
func levelsReducer(currentLevels: Levels, event: Event) -> Levels {

    guard currentLevels.left != currentLevels.right else { return currentLevels }

    switch event {
        case .decreaseLeft:
            return Levels(left: currentLevels.left-1, right: currentLevels.right)
        case .increaseLeft:
            return Levels(left: currentLevels.left+1, right: currentLevels.right)
        case .decreaseRight:
            return Levels(left: currentLevels.left, right: currentLevels.right-1)
        case .increaseRight:
            return Levels(left: currentLevels.left, right: currentLevels.right+1)
    }
}
So far the code is not related to a specific reactive framework, which is great. Let’s write the two feedbacks that will have an effect on each level.
With RxSwift:
func leftEffect(inputLevels: Levels) -> Observable<Event> {
    // this is the stop condition to our Spin
    guard inputLevels.left != inputLevels.right else { return .empty() }

    // this is the regulation for the left level
    if inputLevels.left < inputLevels.right {
        return .just(.increaseLeft)
    }  else {
        return .just(.decreaseLeft)
    }
}

func rightEffect(inputLevels: Levels) -> Observable<Event> {
    // this is the stop condition to our Spin
    guard inputLevels.left != inputLevels.right else { return .empty() }

    // this is the regulation for the right level
    if inputLevels.right < inputLevels.left {
        return .just(.increaseRight)
    }  else {
        return .just(.decreaseRight)
    }
}
With ReactiveSwift:
func leftEffect(inputLevels: Levels) -> SignalProducer<Event, Never> {
    // this is the stop condition to our Spin
    guard inputLevels.left != inputLevels.right else { return .empty }

    // this is the regulation for the left level
    if inputLevels.left < inputLevels.right {
        return SignalProducer(value: .increaseLeft)
    }  else {
        return SignalProducer(value: .decreaseLeft)
    }
}

func rightEffect(inputLevels: Levels) -> SignalProducer<Event, Never> {
    // this is the stop condition to our Spin
    guard inputLevels.left != inputLevels.right else { return .empty }

    // this is the regulation for the right level
    if inputLevels.right < inputLevels.left {
        return SignalProducer(value: .increaseRight)
    }  else {
        return SignalProducer(value: .decreaseRight)
    }
}
With Combine:
func leftEffect(inputLevels: Levels) -> AnyPublisher<Event, Never> {
    // this is the stop condition to our Spin
    guard inputLevels.left != inputLevels.right else { return Empty().eraseToAnyPublisher() }

    // this is the regulation for the left level
    if inputLevels.left < inputLevels.right {
        return Just(.increaseLeft).eraseToAnyPublisher()
    }  else {
        return Just(.decreaseLeft).eraseToAnyPublisher()
    }
}

func rightEffect(inputLevels: Levels) -> AnyPublisher<Event, Never> {
    // this is the stop condition to our Spin
    guard inputLevels.left != inputLevels.right else { return Empty().eraseToAnyPublisher() }

    // this is the regulation for the right level
    if inputLevels.right < inputLevels.left {
        return Just(.increaseRight).eraseToAnyPublisher()
    }  else {
        return Just(.decreaseRight).eraseToAnyPublisher()
    }
}
No matter the reactive technology you choose, writing a feedback loop (also called Spin) is as simple as that:
let levelsSpin = Spinner
.initialState(Levels(left: 10, right: 20))
.feedback(Feedback(effect: leftEffect))
.feedback(Feedback(effect: rightEffect))
.reducer(Reducer(levelsReducer))
That’s it. You can use RxSwift in a portion of your app and Combine in another one, and all the feedback loops will use the same syntax.
For “DSL-like” syntax lovers, there is a more declarative way:
let levelsSpin = Spin(initialState: Levels(left: 10, right: 20), reducer: Reducer(levelsReducer)) {
    Feedback(effect: leftEffect)
    Feedback(effect: rightEffect)
}
How to start the loop ?
// With RxSwift
Observable
    .start(spin: levelsSpin)
    .disposed(by: disposeBag)

// With ReactiveSwift
SignalProducer
    .start(spin: levelsSpin)
    .disposed(by: disposeBag)

// With Combine
AnyPublisher
    .start(spin: levelsSpin)
    .store(in: &cancellables)
Mixing reactive frameworks is no more an issue 👍.
Using Spin in a UI perspective
Although a feedback loop can exist by itself without any visualization, it makes more sense in our developer world to use it as a way to produce a State that will be rendered on a screen and a way to handle events emitted by the users. Fortunately, taking a State as an input for rendering and returning a stream of events from the user interactions looks A LOT like the definition of a feedback, and we know how to handle feedbacks 😁, with a Spin of course. Once a Spin/feedback loop is built, we can “decorate” it with a new feedback dedicated to the UI rendering/interactions. A special type of Spin exists to perform that decoration: UISpin. As a global picture, we can illustrate a feedback loop in the context of a UI with this diagram:
a Spin in the context of a UI usage
In a ViewController, let’s say you have a rendering function like:
func render(state: State) {
    switch state {
    case .increasing(let value):
        self.counterLabel.text = "\(value)"
        self.counterLabel.textColor = .green
    case .decreasing(let value):
        self.counterLabel.text = "\(value)"
        self.counterLabel.textColor = .red
    }
}
We need to decorate the “business” Spin with a UISpin (in the viewDidLoad function for instance).
// previously defined or injected: counterSpin is the Spin that handles our counter rules
self.uiSpin = UISpin(spin: counterSpin)
// self.uiSpin is now able to handle UI side effects

// we now want to attach the UI Spin to the rendering function of the ViewController:
self.uiSpin.render(on: self, using: { $0.render(state:) })
// And once the view is ready (in “viewDidLoad” function for instance) let’s start the loop:
self.uiSpin.start()
// the underlying reactive stream will be disposed once the uiSpin will be deinit
Sending events in the loop is very straightforward; simply use the emit function:
self.uiSpin.emit(Event.startCounter)
What about SwiftUI ?
Because SwiftUI relies on the idea of a binding between a State and a View and takes care of the rendering, the way to connect a SwiftUI Spin is slightly different, and even simpler. In your view you have to annotate the SwiftUI Spin variable with “@ObservedObject”:
@ObservedObject
private var uiSpin: SwiftUISpin<State, Event> = {
    // previously defined or injected: counterSpin is the Spin that handles our counter business
    let spin = SwiftUISpin(spin: counterSpin)
    spin.start()
    return spin
}()
You can then use the “uiSpin.state” property inside the view to display data and uiSpin.emit() to send events. As a SwiftUISpin is also an ObservableObject, every state mutation will trigger a view rendering.
Button(action: {
    self.uiSpin.emit(Event.startCounter)
}) {
    Text("\(self.uiSpin.state.isCounterPaused ? "Start": "Stop")")
}

// A SwiftUISpin can also be used to produce SwiftUI bindings:
Toggle(isOn: self.uiSpin.binding(for: \.isPaused, event: .toggle) {
    Text("toggle")
}

// \.isPaused is a keypath which designates a sub state of the state,
// and .toggle is the event to emit when the Toggle is changed.
The UIKit (AppKit) and SwiftUI ways of using a UISpin are very similar allowing you to integrate feedback loops previously written for UIKit screens inside new SwiftUI components. Mixing UI paradigms is no more an issue 👍.
Conclusion
We have reached our goal: to propose an architectural pattern implementation that can ease the transitions between incoming technologies. In the Spinners organization, you can find 2 demo applications demonstrating the usage of Spin with RxSwift, ReactiveSwift, and Combine:
- A basic counter application: UIKit version and SwiftUI version
- A more advanced “network based” application using dependency injection and a coordinator pattern (UIKit): UIKit version and SwiftUI version
There is the Spin.Swift repo. PR are of course welcome (so as ⭐️ 😏). I am planning to develop a Kotlin implementation, compatible with both RxJava and Flow (any help would be appreciated). I hope you enjoyed this article. Feel free to leave comments so we can exchange about it.